One of the tricks I have been using to keep things growing everywhere in the paludarium is by regularly watering the background. In this post I will describe how I made a spray bar and how I mounted it inside.
The idea
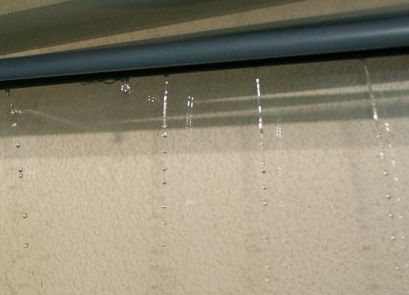
In order to get water onto the background and have it nicely sift through I have been using a 12mm PVC tube with a series of 1.5mm holes drilled into it. Really simple, and works well even with the smallest of pumps:
Example from an older setup on how to use a spray bar
If you want a paludarium where plants will grow under water, I have learned you need to separate the aquatic water system from the “land” water system. The sewer-dump does just that.
The idea is that any water you add in the aquatic part which is too much will overflow in the sewer-dump. Watering the backdrop for example comes from the sewer dump. Any water falling on the (yet to build) land portion will be dumped here as well.
This accomplishes two things: A steady water level and a clean aquatic water world!
1. A steady water level
Anyone who owns a paludarium will know: The water levels tend to fluctuate constantly. Evaporation, adding water, it just varies all the time. How to solve this? Well, just add water on a regular basis (aka automated!) and make sure the water can overflow from the aquatic part. Like some cool infinity pool that keeps the water level at a constant. Excess water overflows into the sewer-dump section.
2. Clean aquatic water
Over time inside a paludarium soil will form. You can choose to add soil, or to leave it out… But as the paludarium becomes bio active rotting leaves will form soil. Lots of nutrients, but that will simply overpower the aquatic section. Too much nitrates and phosphorites will kill fish, ruin plant life, and if you are unlucky cause algae to massively bloom instead.
How to make sure that won’t happen? Divide the water systems! The sewer-dump recycles any water for the land portion. Any water from the land portion should flow back into the sewer-dump as well. Aquatic water that is “too much” flows in there as well.
What the sewer-dump looks like
So the sewer-dump in itself is pretty basic: It is a sealed-off portion of the paludarium by glass. I used to have a glass “wall” 10cm from the rear for this, but in order to maximize the aquatic water section this time I decided to make a really small sewer-dump:
The sewer-dump: Nothing more than three glass plates separating the aquatic water system from the “landmass” water system
The trick is of course that these pieces of glass have the exact height of the water level you require inside; in my case it is 5mm below the front window vent.
You can see that there are three PVC feedthroughs; one outside the sewer-dump and two inside. The one outside is used to draw water from the aquatic part into the external canister filter (notice the 3D printed filter cap on the right) so it obviously needs to sit in the aquatic part.
The one in the middle is used for the canister filter return line. Water gets pumped in through the long PVC tube you see in the picture above, which ends up in a (yet to construct) waterfall. That waterfall flows back into the aquatic section closing the loop. It is vitally important that no water gets “spilled” into the sewer-dump in this process!
So where does the excess water in the sewer-dump go?
The PVC tube on the left in the picture above is the real trick: Any excess water will flow through this pipe (in the picture the 20mm PVC tube is too short; I need to order more 😉 ). It will flow out of the paludarium eventually into the sewer (the real world sewer that is). I will capture excess water into a small canister under the paludarium which I will empty using a pump with 6mm hose that goes to the sewer (unfortunately the location of the paludarium is in the mancave, meaning it sits lower than the sewer system in the house).
After checking, evaluating, changing, re-evaluating and changing again, I finally came up with the final design of the glass paludarium. I had already put up preliminary specs in the older blog post “Paludarium 2.0: Ordering glass“, but now specs have changed and are definitive. Bring forth the offers from different paludarium building companies!
Changes in the new design
Some adjustments were made in when finalizing the design for the glass. The most important changes: Read more »
When I built Paludarium 1.0, I was positive on having solved the water poisoning by not using potting soil anywhere in the landmass. As it turns out, the plants on land rot away leaves and build their own soil inside. Very nice for the plants, not so nice for the fish inside. since the water streams through the soil, it picks up a lot of chemicals that aren’t very healthy for the fish in the aquatic part.


 RSS
RSS LinkedIn
 Twitter
 Email
Email
Nice post, thanks !