One of the tricks I have been using to keep things growing everywhere in the paludarium is by regularly watering the background. In this post I will describe how I made a spray bar and how I mounted it inside.
The idea
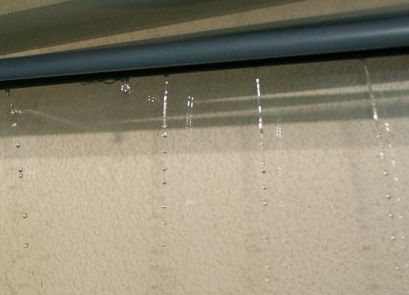
In order to get water onto the background and have it nicely sift through I have been using a 12mm PVC tube with a series of 1.5mm holes drilled into it. Really simple, and works well even with the smallest of pumps:
Example from an older setup on how to use a spray bar
The Aeryn module was designed to allow air to be taken into the paludarium, heated and/or moisturized (mist) before it enters the setup. This is all part of the idea to have “no tech inside” but rather outside for easier access, maintenance and replace with updated versions.
What is Aeryn
Remember the sci-fi series “Farscape”? I originally designed this module named the Aether module. In honor of Farscape I renamed this module to Aeryn 🙂
The Aeryn module is a box-shaped module approximately 60x15x13cm in size, and is inserted into the hood above the paludarium. It lines up with two 12cm holes in the ceiling, where two fans draw in air from the outside. On the end of the module a 40mm pipe leads to the meshed strip on top of the paludarium where the conditioned air gets inserted.
Aeryn section 1: the air intake
The first section of the Aeryn module contains two 120mm fans, RPM regulated (and RPM measured back). These fans are put on top of the module, blowing down into the module. So first the airflow needs to be guided to flow sideways, which is accomplished using a 3D printed guide as shown below:
First section: After the air is pushed in from the top using two 120mm fans, this 3D printed guide directs the air to the left, on to the next sections of the Aeryn module.
After some measuring, more measuring and several conversations with the people at Blue Lagoon (A Dutch Terrarium shop who build custom terrariums / paludariums), I pulled the trigged and put in an order.
The Big Bad Glass Box has arrived!
It took them less than a week to build. I got a phone call that my paludarium was ready for delivery… So I needed to speed up the construction of the cabinet! I had triple verified where the holes should be drilled in the glass… But that stays exiting every time. Will they have drilled in the right place, did they measure from the outer wall or the inner wall? Did *I* measure correctly when I drilled three big ugly holes in the cabinet for the PVC piping to go through? Luckily, in the end it all worked out great.
New things! Everything is progressing nicely. Did additional testing on the 230VAC detection circuit and wrote software to read SHT31 digital humidity/temperature sensors. Also added a ClosedLoop function so analog inputs can be used to compare to store values and have an outputs act on the comparison.
230VAC detection
Finally I had the time to properly measure the mains voltage inputs. No shorts or anything… So I decided to go on and plug in the mains voltage into the Artemis.
The 230VAC detection circuit is connected to D48 (ICP5 on the Arduino), which mean I could potentially measure the exact frequency of the mains AC voltage. Still, I do not require to have that, so instead I built a simple timer that resets if the phase comes up, and counts down if the phase disappears. This way I always have a stable reading on the signal, even when the Artemis accidentally measures on an exact phase zero crossing.
        if (digitalRead(PIN_230V_DETECT) == LOW) // Active? Reset Timer.
        {
                TIM_50HzDetect = 10;
        }
        else
        {
                if (TIM_50HzDetect) // Not active -> count 2 zero and stay.
                {
                        TIM_50HzDetect--;
                }
        }
Unbelievable what can be accomplished in only two hours. Today I finally unpacked my Raspberry Pi and started to play with it. Pretty soon I had it up and running… This is going to work out just fine 🙂
The Raspberry Pi. This will be the new brains behind the Paludarium v2.0!
I got an email today, and guess what… The paludarium will be delivered tomorrow!
I just finished prepping the place it should sit:
The protective base where the glass of the paludarium will sit on. Everything is prepped… Let’s hope I drilled the holes at the correct position.
The kitchen cabinet now has holes drilled at the exact position where the sewer drain and the filter drain will sit. These holes to all the way through the wooden top. AT the back of the top plate I removed a strip of material as you can see. Through this strip I will feed any pipes and wires I need to go in and out of the paludarium.
On top of all there is a protective rubber layer. This will prevent the glass from breaking if the plating is not 100% flat (or has any irregularities).
I am fully prepared for the arrival of the paludarium!
The word is out… The glass is ordered! Measures are now final, I am very thrilled to see the finished product! I ended up ordering at www.terrariumhuis.nl after visiting the shop where they actually glue at all together. It is a very small shop, yet it delivers most of the terrariums and paludariums in Dutch shops.
They were very interested in building my “special” (as they mostly build standard sizes). At one time I ordered a paludarium from the same shop which was of acceptable quality. Since then they have improved a lot I was told, so I cannot wait to receive the order and building out the Paludarium 2.0! The measures are an exact match to the drawings posted in the Definite glass specs.
As soon as the glass arrives I will post pictures on this blog, and of course all the steps required to build it will be documented here as well! Can’t wait!
After checking, evaluating, changing, re-evaluating and changing again, I finally came up with the final design of the glass paludarium. I had already put up preliminary specs in the older blog post “Paludarium 2.0: Ordering glass“, but now specs have changed and are definitive. Bring forth the offers from different paludarium building companies!
Changes in the new design
Some adjustments were made in when finalizing the design for the glass. The most important changes: Read more »
As I’ve started to think up Paludarium 2.0, more and more ideas are popping up. The most recent one: How to build the water household. With all the things I want, and all the technology I can build, I am now thinking up the specs and features I need/want, and how I can build them so that it will actually work, and most important, KEEP working.
Specs for the flow of water
I have quite an extensive must have / wanna have list. Here they are in random order: Read more »
As Paludarium 1.0 is sold and gone, I’ve begun to design the cabinet that will be built under the new paludarium. I plan to use kitchen cabinets for this purpose, and include a section to put the TV on as well.
Using kitchen cabinets
When building our new kitchen, it dawned on me that using kitchen cabinets might make the perfect cabinet Read more »


 RSS
RSS LinkedIn
 Twitter
 Email
Email
Nice post, thanks !